Pages

Tuesday, January 31, 2012

A couple ReFashions

 Applique Skull Onesie...
I LOVE LOVE LOVE wonder under....its SO simple to use and makes my brain create  fun things for those extra special gifts.
I just whipped up this cute skull for K.K's little one.
What do you think?
Just simply make your own pattern and iron on!

And now onto MAKING a shirt that doesn't fit you anymore into your childs shirt.
First inside out the shirt you are shrinking...and lay one of your kids shirts on top of it....
Cut off the extra on the bottom (which you can hem if you want...I don't)

outline with a pen, marker, pencil (whatever) and sew up and out the arm twice...THEN cut off the excess.  Most people would separate the arm and add it again...I am too lazy and this works for me


 Heres another pic...
super simple, and new clothes for the kids.... :O)


Friday, January 27, 2012

Valentines Day Goodies

 My hubby and I drove to Vegas and I need to keep my hands busy or I eat THE WHOLE TIME! (and we all know our butt's don't like that!) So I did a bunch of little Loves and XOXO's...I just made it up as I went...hence the unperfectedness.

 I cut them out, frayed the edges, added a fun print behind it, and tacked it in the corners onto a 2x6.   The others are just my doodles on wood and then I cute them out....I am LOVING bead board and Mod Pod random V-Day paper to them, sand, and then spray glittering to add that perfect SPARKLE!!!
 Get your CRAFT on.....

Tuesday, January 24, 2012

Tasty Tuesdays: The Baked Brownie

I'm back.  I've taken an almost five-month break from devoting any time to this blog, because I had a bun of my own baking.  Five months ago, we welcomed our fourth child to our family!  His name is Calvin and he is just perfect.  In honor of his perfection, I decided that my first new recipe card after my maternity leave should also be perfect.  So here you go.

I have a confession to make: whenever a recipe calls for eggs at room temperature, I get a smuggitty little smile of smugness on my face.  Because I keep chickens and ducks.  And I always have room temperature eggs.  Either I can go out and collect some right when I need them, or I already collected them and they're on the counter waiting to be cleaned, or I already collected them, cleaned them, and put them in the fridge . . . but they're not quite as fridge-cold as the eggs that I collected, cleaned, and cold-ed the day before.

But, darling egg-layers notwithstanding, I am smug every time I make these brownies anyway, because they. are. THE. BEST.  No, I'm serious.  I never thought I would invoke Oprah's name on this blog, but I found this recipe  because the picture of the brownies looked amazing, and when I clicked a link to find out more, I read an article about how this recipe is from the Baked bakeshop in Brooklyn, is one of Oprah's favorite things, and is also America's Test Kitchen's favorite brownie recipe.  Hell-o.  With an endorsement from A'sTK, how can you go wrong? (For other delicious recipes from A'sTK on my recipe blog, BexBox, you might want to try Barbecued Dry-Rubbed Chicken, Ultimate Cinnamon Buns, and Asian Lettuce Wraps).

They are super rich, which I love, because I'd rather taste more chocolate and less sugar in my brownies.  And they have that gooey, perfect crust that only the best brownies have.  I have adapted this recipe slightly to mine and my husband's tastes: adding another 1/4 tsp of salt and another tablespoon of cocoa, leaving the brown sugar unpacked, and cutting out the teaspoon of instant espresso powder (I'm a member of the Church of Jesus Christ of Latter-day Saints {Mormons}, so I don't drink coffee or tea and try to avoid other caffeinated beverages).

You can google "The Baked Brownie" and get all kinds of amazing pictures, but this is one of my own actual photographs taken on my own actual mommy camera.

It's as difficult to get a picture of this brownie as it is to get one of the elusive Bigfoot--they vanish before your eyes into the dense undergrowth . . . er, into the dense husband's mouth . . . er, they just vanish quickly.

You're very welcome.

Monday, January 23, 2012

Easy Party Lights!

Super simple way to spice up lighting at a party! Or to spice up any type of jar for holding party favors/utensils/napkins/etc... Really, the uses are limitless!

Take any size or shape jar/vase- clear, & add rubber bands around it.  Be creative.  The rubber bands can be straight, curvy, overlap, try a few different ways until you find what you like!

Spray paint a color of your choice & Let Dry!

Pull off the rubber bands, and TADA: Super cool Jars!!!

I happened to use these ones for the Breaking Dawn Pt. 1 party I hosted! (little tea light inside the black vase)

Bonnie is the only sister that wasn't able to come.  We missed her a lot!  This is our mom, five of the sisters, and both sisters in law!

And a picture of a few of us with Edward and Bella at the Premiere!
WHAT WILL YOU USE YOUR VASES FOR?

Wednesday, January 18, 2012

Kitchen Home Organizer

My Husband Brought home a crate lid to an old crate box about 4 years back.  I have been dreaming of making a kitchen organizer with it, and I finally did it!  It was actually super simple.  
Wish I would have done it earlier.

Took the cork part of a corkboard I already owned and cut it to fit in half the crate box lid!

Next, I added Scrap Paper of my choosing around the border.  I decided to use a solid print in case I ever decide to change my kitchen decor!

Scuff up edges with Ink!

Filled the other side with Cardboard to more easily work my calendar plan

Cover the cardboard with paper color of your choice. again I chose solid colors.

Added a rectangle piece of sheet metal for a magnet board!

Found an awesome website to print out some calendars!
http://www.printfree.com/Calendars.htm
A Three month plan!  Every third month is the same color paper!

Purchase a few clasps that you would use for file folders. (Acco File Fasteners).  Punch them through on the BACK of the cardboard BEFORE you glue the cardboard into the crate lid. That way only the clasp parts are sticking out! 
This is the glue I used for most of the job- to attach the cork & the cardboard down to the wood!


Almost done.  I wanted some type of basket to attach under the magnet board to hold pens, important mail/envelopes, etc....
  

Found the perfect holder (five months later) at D.I. for 50 cents!!! Nailed it in with two short nails!

And Viola!  All done!!!

I can't even remember what I did before I had this.  I use it every single day, and I get many compliments!

Now go out and make your own Organizer!!!

Friday, January 13, 2012

Gallery Wall

I am absolutely in LOVE with all the beautiful gallery wall displays.
 But let's face it....
I have small hallways and limited wall space, so clustering frames together would make me claustrophobic.
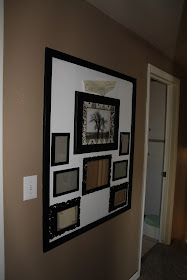
But I have had this idea for awhile to frame in, with molding, a piece of the wall and then collage picture frames.
Making it appear better balanced in my small space.

I first framed out my wall space. 

 I then painted the inside a stark white. I knew this would make everything pop. I started with stripes, but quickly decided that it was still too much for me. I needed to keep it clean and simple for this space.
So repainted the wall back to the stark white.


 Once I had it framed in and painted, I also painted the molding black.
(Note to self....make the molding frame first, paint it, and then pin nail it on....That would have saved me some taping and retouching. )
 Then I dug out my frame bin and started collecting all the frames I wanted to use for the wall! 
I took them outside to spray paint them black and then started to piece each frame  together on the wall. 
 More frames dug out and painted......

And VOILA!
Picture Perfect Family Tree Wall. 
 I love how slim to the wall it all is. My hallways are narrow and it doesn't make me feel confined!


 Now to collect which pictures I want up on the wall.
I am doing several with all kinds of trees, black n' white. 
And the rest with pictures of our family! 

Do you LOVE  it as much as I do??
I can't stop looking at it!
XOXO,
BON

Stop by soon for an updated wall with the pictures!

Wednesday, January 4, 2012

Chair Revamp!

Here is a chair revamp that I did a while back.
I got this chair at the D.I. for only 5 dollars!

It didn't take much to turn it into something that was so much better looking!

I unscrewed the seat and back rest and whipped out my black spray paint.


It took a couple of coats and it was looking great.

I bought some fabric a while back for REALLY cheap. It was the perfect color and pattern.
I stapled the new fabric over the old seat and back rest.

As soon as the paint was dry, I put it back together!


It was one of the first "projects" that I had taken on, and I could not have been happier!

BEFORE and AFTER~!

Savanah

Monday, January 2, 2012

Bling Your Jeans

You have all seen them.... those rhinestone studded pockets of the trendy girl jeans. 
Only problem is they can cost a fortune.
Well, not anymore.

My friend Shauna let me in on a little secret. 
You can totally do it yourself with out a bedazzler.
All you need is....
A super cute pair of thrift store jeans! Found this cute pair for $4.00 for my 10 yr old.
 Loved the big stitching and they already had a diamond studded button pocket!
Some E6000. I found mine @ Walmart in the Craft section.
Some flat backed diamond accessories to bling out your jean!

 My friend said she has been doing this forever. 
That after letting it adhere for the adequate amount of time you can machine wash your jeans too! 
SCORE!

I started out by adding a role of bling right along the pocket flap...
 Then added one more role of bling for pizzaz. 
I could have done tons more...but my oldest doesn't like anything "too girly" (in her words) So this amount was perfect!
 What are you waiting for? 
Go bling some jeans! 
You know you want to!
XOXO,
Bon