Pages

Thursday, February 16, 2012

DIY Dress


I am coming up on my 7th month of pregnancy, and let's face it...I am having a hard time feeling comfortable in some of my church clothes.

I was so excited when I found this little tutorial for a DIY Elastic Waisted Dress!

All you need is a tank top, 2" elastic (I could only find 1 1/2" at Wally World), and fabric of your choice! This yellow happened to be on sale for $2 a yard at Walmart!


I had this tank top laying around in my craft supplies. I almost got rid of it the other day, but am so glad I finally found a use for it!

Start by putting the tank top on and measuring right underneath your bust. (Leave about an inch or so extra for sewing room or mistakes.)

Then cut your take top at your desired length.


Next, I pinned the elastic to the tank top and got out my amazing sewing machine. (I just recently got it for Christmas, and I have been having so much fun with it!)


Ta -dah! Now you are ready to attach the skirt portion.


Please don't mind my horrible pinning job...
I tried...hence the word "tried"... to make pleats in the skirt as I went.


Once your fabric is sewn to the elastic, lay it out and decide on the length that you would like your dress to be.


I sewed the side seam before I did the hemming of course...

'

Press the hem with your iron and hem the bottom!


And there you have it!! It is quite simple and fast! I now have a dress that I feel very comfortable in!


Excuse the blurry mirror pics. Eli wasn't home so I had to improvise.

Here's the baby bump!


Add some accessories and your outfit is complete!


Now go and get your sew on :)

Love, Sav

Wednesday, February 15, 2012

Valentines Wreath

I know it's a day late, but you can use this wreath heart even if it's not V day.  Very easy, but pretty time consuming to complete.

I can't take credit for this craft, as an awesome friend in my neighborhood actually made one first & got the supplies for a bunch of us that do craft day together.  But I thought I would share with all of you, because it is such a cute idea.

buy an inexpensive foam wreath heart

Red felt.  trace circles & cut them out (this part takes quite a while.  and you need A LOT of circles to fill up your wreath!)

Fold your circle in half

Fold in half again and put a pin in it.

Heres a short video tutorial on how to fold your circle.

Pin it on your wreath & Repeat with each felt circle.


back of the wreath.  You don't have to put the felt circles on the back, because no one will see it & it will sit flush with your door/wall if you keep it blank.  Add a ribbon to hang your wreath.

Finished product.

I LOVE it!  

Hope everyone had a great valentines day!!!

Saturday, February 11, 2012

Easy DIY table runner

I am LOVING burlap!!
 
 Obsessed might be a better word! 
I have tons of plans to use lots of this natural goodness all over my home.
I had this black table runner before.(Above pic) 
I love it, but definitely want more neutrals and greens in my kitchen too.
So I decided that a burlap runner would be perfect!

What to do
First, cut your burlap to the length of your table and width you would like.
 Next, simply fray the edges....no hem required!
Finally choose some sort of accent fabric. 
I choose black lace, 'cause lets face it...lace is also an obsession!
Simply cut 4 strip of lace the width of your runner and sew them down. 
I had my mom sew it for me.
If you don't sew I bet you could use sewing glue as well!
 Simple, easy, and the perfect look for any home!
Now to tackle these projects...YIKES....I need more energy!
What have you been working on?

XOXO,
BoN

Tuesday, February 7, 2012

REDO FINALLY part 2 Of Bunk Bed Frame

2 years ago I told you all I would show you what I was going to make with my kids bunk bed frame, a year ago I made it...but I am FINALLY posting...at the demands of Bonnie! :O) ( (LINK HERE)  to see the Bunk Bed frame I made out of the one I had) AND here is what I made from the Bunk Bed Ends
I have seen single benches but not DOUBLE. Now all 6 of my kids can be in time out at the same time... :O)
Don't be Jell!!!!!

TOTALLY DRABULOUS...to FABULOUS!

Monday, February 6, 2012

EAT....

 I have totally wanted to copy the word EAT I have seen on T.V sitcoms and so I whipped one out...
WHAT DO YOU THINK?
I doodled the font I wanted, cut them out, mod pod, and sanded, clear spray painted to set...and VWA-LA! I LOVE them and one of my kids said "Mom we know our goal is to not complain about what you make, but did you really have to make an Eat Sign." 


Saturday, February 4, 2012

Printable FREE-B


I love to make little list and things to print and have on my fridge.....enjoy!

Friday, February 3, 2012

All that Jazz

This is another simple painting project!

My husband HATES colored walls. He doesn't necessarily love white walls either.  if he has his way, every wall in our house would be tan... BORING!  So, I decided to compromise.  I told him I wouldn't paint our family room (Jazz music themed) a bright color, IF he let me paint the furniture whatever color I wanted.  He was hesitant but finally gave in! 
boring plain end tables


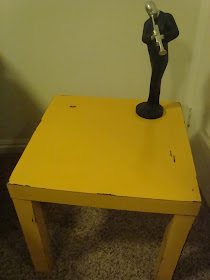
Paint them yellow (I didn't sand them down before I painted.  I SHOULD have, because it took me 4 coats to get this covered!)
scuff up the edges & add some scratches to the top with simple sandpaper!
Spray painted some end table decor/ room decor for my family room.
More spray painting - no more plain black candlesticks

add pieces to the end tables (the purple wicker basket underneath holds  my babies wipes/diapers/creams for when we are downstairs and I don't want to run upstairs for a diaper change.)

And the coffee table, i DID sand this one down (luckily)

I Painted it black first, and then lime green, so when you scuff it the black shows through!

Sprayed it with a gloss finish so it wouldn't be sticky and so the paint wouldn't get scratched off.  (Had to bring it inside to dry, outside is far too cold.)

Finished product.
 My Husband was actually pleasantly surprised at how much he liked the bright furniture!