Showing posts with label Becca. Show all posts

Wednesday, May 14, 2014

Awesome Art from Children's Books

I have always loved Arnold Lobel, but especially since I have had kids of my own and read them the Frog and Toad books.  It's a great first introduction to humor for your kindergarten-aged-kids.  Grasshopper on the Road never fails to make me laugh, as well.  When grasshopper meets a bunch of beetles who believe that morning is the best, and he dares to venture that he likes evenings, too, one beetle replies in a deadpan, "Stupid."  It cracks me up every time.

So, quite a while back, I found an Arnold Lobel book at the D.I. that I had never seen before, called Whiskers and Rhymes.  It was pretty beat up.
It's nursery rhymes populated entirely by cats, and many of the poems are quite funny.  I flipped through it, and found the coolest Arnold Lobel illustration ever: a cat with a beard reading a huge stack of books--so big that his house is coming apart.  And the rhyme that accompanied the illustration spoke to my SOUL:
          Books to the ceiling, books to the sky! 
          My piles of books are a mile high!
          How I love them!
          How I need them!
          I'll have a long beard by the time I read them!


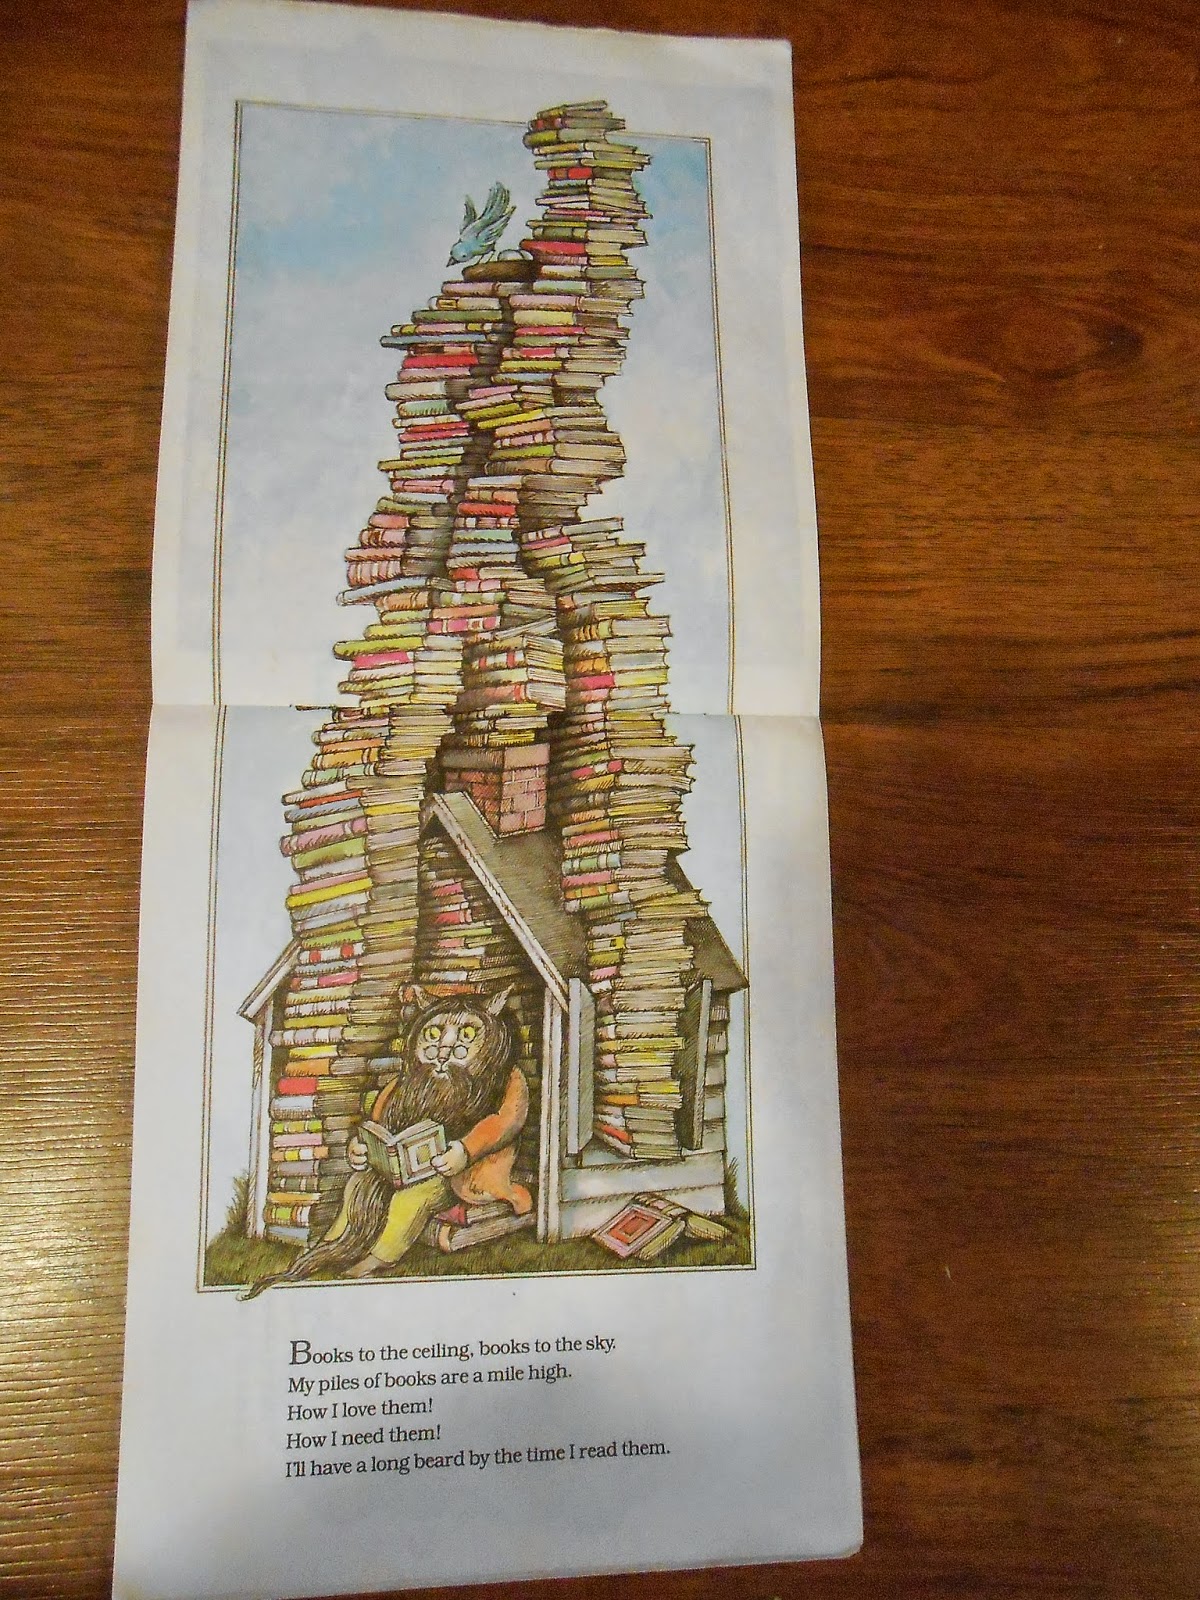
This is one of the only illustrations in the
book that takes up an entire layout.
I knew I must have this illustration and poem hanging in my "book nook"--a little landing at the top of the stairs in my 1915 house, where all the children's and young adult books are kept.  It's a little ironic, because I've been meaning to frame a few different pages from Lobel's Owl at Home, since my book nook is heavily populated with owls . . . but it took cat nursery rhymes to transform this idea in to reality.  It was just serendipity that they happened to be from the same author/illustrator.

Okay, first I had to find long, skinny frame for the illustration.  It actually took a few months of looking at the D.I. till I found the right one:
The art inside this frame had nowhere to go but up . . .
Next, I removed the staples from Whiskers and Rhymes and took out my picture.  It wasn't the middle page, so it was two separate pages that I had to carefully tape together (on the back, of course).

I cleaned up the frame, trimmed my picture a bit to make it centered, then covered the WRETCHED dishes picture with the delightful book picture.  The dishes picture wasn't matted--it had a faux-matte of navy blue around it.  I considered cutting out a matte, but didn't have the tools to make it perfect, so I just carefully glued my picture in the center.


 Now the best part!  Putting the picture inside the frame and hanging it up!


This entire project cost me $2.25: twenty-five cents for the book, and two bucks for the frame.  I didn't even have to paint the frame or change the color of the matte!

I love it so much that now I'm finally on the prowl for some cool, smaller frames to put some illustrations from Owl at Home into (I have long had two copies of Owl at Home--one to read and one for art).

I also love it so much that it inspired my choice of books for my May display--I love to change the children's books on display like a library does, and usually have a holiday or seasonal selection of books for each month.  In March I had all green books; in April I had chickens/ducks/geese books on display for Easter.  I was thinking of doing books with flowers for May, but discovered that I only have three books with large flowers on the cover.  But as I was going through all the children's books, I discovered that there are quite a lot which have a similar thing on the cover: CATS.

Tod likes to sleep right at the top of the stairs, so I moved
him over and created the perfect themed photo-op . . .
{Also, my kids are all obsessed with Cats, Cat Breeds, and Cat Care--who knew?}
My next post will be about my book displays--it is so cheap and easy to collect some great children's books, it's a fun and adorable way to decorate, and it's an awesome way to motivate your kids to READ.

Tuesday, September 3, 2013

Tasty Tuesdays w/ Becca

Have you bookmarked my sister's recipe site yet? 
If not, TRUST me, you are missing out. 
Not only does her site get your mouth watering but it gets you motivated to try something new and delicious in your kitchen.

This happens to be one of my favorites.


It is perfect for these days that your kids are back in school. It is an easy recipe with step by step instructions. And the best part is the printable recipe card that is ALREADY made for you.
So go check it out here!

Wednesday, November 28, 2012

Flared Jeans into Skinny Jeans Tutorial

It's a happy day when you fit into jeans that you've been waiting for YEARS to fit again.

But it's a sad day when you realize they are grossly out of style . . . and maybe *ahem* they were even out of style the last time you wore them.


Start with your wretched flares . . .
Try them on inside-out.
Pin (on the outside) one leg to a comfortable fit,
be sure to leave at least an inch away from your
legs--it will be smaller when you sew it. (You can
go as loose or tight as you want--I don't like my
jeans skin tight on my calves. These are actually
more "boot cut" than skinny jeans.
Remove jeans and mark pins with a highlighter
Remove pins, and use a ruler to connect your pin
dashes--make the line as straight as you can
[Only YOU can prevent forest fires]
Sew over the line, be sure to backstitch several times at both ends.
And sew a second seam alongside the first . . . 
Here's how it looks before cutting . . .
Cut away the flare, not too close to the seam
Fold your sewn and cut leg over the "un-sewn" one.  I used my iron
on this step to make sure the legs were completely the same.
Cut the"un-sewn" pant leg.  Then sew a double seam up the side.
Try those puppies on!
Totally got these cuties at Deseret Industries
I don't care if light-colored jeans are out.
I love 'em.


Sunday, November 4, 2012

Halloween Costume Idea: witch shoes

I know, I know.  This idea would have helped you out A WEEK AGO.  Let's just say I'm helping you out a year in advance.  I like to plan ahead.

My sweet mother-in-law sent my daughter Mollie the CUTEST Halloween clothes at the beginning of October, which prompted Mollie to decide she wanted to be a witch for Halloween.  I was so excited!  She already had a witch hat, so I just needed witch tights and some witch shoes.  I paid $8 for some witchy high heels at the D.I., with plans to turn them into five-year-old witch shoes.  I think they turned out pretty cool.


Original Banana Republic high heels: $8
I used a bread knife to saw through the shoe. Then I hot clued a pair of her
Sunday  shoes (that have been getting snug, anyway) and glued those pointy
babies on over the shoe.  VOILA!.
With the shoes, the hat, and the clothes, and a pair of stripey tights from Target, she was ready for a photo shoot.  This is the first year I have thought to take pictures BEFORE Halloween Day, and I was proud of myself for thinking of it, because those pictures are always taken in a mad rush before trick-or-treating.  {When I write "mad rush," I really do mean mad: my kids are angry with me for cutting into their candy-collecting time with photos.}


That shirt "Tutu Wicked" was totally designed
and made by MY fabulous mother-in-law.


If I have baby chicks, they are going to be
incorporated into every photo possible.


Beyond adorable, right?  I certainly think so.  And every I showed these pictures to thought so as well.  So assumed Mollie would like to see how cute she looked.  As soon as I showed her the above photos, she looked at me, her eyes filled up with tears, and she wailed, "Mo-ommmm, I just want to be Rapunzel!"

C'est la vie, people.


Monday, September 24, 2012

Corner Hutch Gone Fabulous

My husband and I have four kids, four rabbits, twenty-five chickens, and two cats.

We also own a 2-bedroom house that is 1400 square feet and was built in 1915.

You can go ahead and feel sorry for me . . . I don't.

Our oldest son makes his bedroom in the short-ceilinged basement with the food storage and seasonal items.  Our other three share the "big" bedroom (about 28 feet by 12 feet) and my husband and I take the small bedroom (10 feet by 12 feet).  We love love LOVE our small house.  It's cute and cozy, and, best of all, there is a finite amount of space--we can only own so much stuff and we consider this a huge blessing.  (Plus, not to brag, we have a big ol' honkin' yard).

However, because there is limited space . . . if I ever get something for my house, it has to be one of two things: beautiful, or useful.  This corner hutch happens to be both.

I'll have to figure out what to put on the bottom two
shelves that my 13-month-old won't scatter everywhere
My totally awesome friend Meg GAVE this hutch to me . . . because generous is her middle name.  She refurbishes and sells furniture, and she could give my sisters a run for their money with her interior designer skills.  Check out Meg Torman Designing.  She's beyond compare.  She had used this hutch for her boys' room, then painted it turquoise to go with a bedroom set that she was gonna sell.  I happened to be over at her house during the height of her cleaning-out-the-garage pique . . . and she told me to take it.

Did. I. Ever.

I knew the perfect place for it, and I knew the perfect use for it: 1- dining room, 2- craft supplies. BOOM.

Before . . . 
My sweet safety-goggles-wearing husband went to town sanding
it for me (he wore the goggles using the belt sander)
Sanded and ready to paint!  I sprayed white spray-
paint in all the hard-to-get cracks before using a
paintbrush and an indoor satin white paint 
Coat number one . . . 
Three coats later . . . I can't decide whether or
not to put that little door back on the bottom shelf
I sprayed a coat of polyurethane on it before
bringing it inside, so it won't get tacky.  I also totally
anchored it to the wall, because that's how I roll.
Crayons in a wide-mouthed mixing bowl ($1.50 at the D.I.)
for Miss Mollie's easy access
Scissors and glue sticks in a cookie jar ($1)
Colored pencils in a retro quart pitcher (also $1)
Watercolor markers in a sweet triangular jar with
a cork lid ($2), baby colored pencils in a baby jam
jar (leftover from a yummy, homemade Christmas gift)
I love how it turned out: it takes up so little space, but still dresses up the dining room, adds a splash of color, and makes it so I never have to get craft supplies from the cupboard again.  In short, the perfect piece of furniture.


Now I can enjoy masterpieces like this on a daily basis.  (Notice the "M-O-M" just under Diego's backpack?  Yeah, this was multi-colored just for me).


Thursday, September 20, 2012

Patio Decor: Geography in Your Own Backyard

I have been waiting for this moment since I first gave birth eleven years ago . . . My son is in fifth grade.  And he is learning STATES AND CAPITALS!!!!!

Finally.  My area of expertise.

Of course I love maps (who doesn't?).  One of the first purchases I made for our first apartment was a laminated world map and United States map.  Later, I bought an actual roll-down map of North America off Ebay (I gave it to my sister Hanna when I had to build bookshelves in the only feasible place in my entire house that this map would fit . . . but that's a story for another time).  And my favorite way to wrap presents is with map-paper from old road atlases (check out the post I did here about it).  One of my favorite gifts my husband ever got for me (in 2005) was this geography coloring book, after he watched me print out maps from the Internet and spend hours coloring and labeling them.


But only having a fifth grader could prompt me to do what I have dreamed of doing since having my own home: painting a map of the United States on my very own concrete patio.  Oh yeah!  One week later, and I finally have the energy to blog about it.

I tried to "freehand" an outline of the US of A with chalk just by looking at the map in my atlas.  Um, yeah, Texas was even bigger and freakier-shaped than usual, and Maine and Florida belonged where Newfoundland and Cuba belong, respectively.

My "canvas"--the concrete patio on the back of our house.
Poor Calvin got to watch the entire two-hour process . . .
So I had to do it a real way.  I carefully drew a grid of chalk on my back patio.  It was thirteen, 1-foot spaces wide by six, 1-foot-4-inch spaces long.  And I even made the longitudinal lines get bigger as they went South . . . the better to represent the curvature of the earth, yo.

Totally set the timer and took this picture of myself . . . shameful
It took me about twenty minutes to lay out the grid.

That bowl has a wet rag in it so I could "erase" my mistakes
Then I began to work on the states with chalk.  The same way as reading: left to right, top to bottom (Only I actually went top to bottom, then left to right.  The West Coast must be chalked first).  That took an hour and a half.  Whew.  (The next day, I felt like I had done a thousand squats . . . as I very well may have done).

The West . . . like you've never seen it before 
All the easy, big states . . . 
I ended up using both atlases (one for kids and one for grownups)
because one had better longitude / latitude lines, and the
other had better outlines of the states themselves
When I finally had the whole thing done, I was so excited to start spray-painting.  "WAIT!"  You're thinking.  "Spraypaint?"  Unfortunately, my brain never told me that it might not be a good idea, because spraypaint is 1) fast, 2) cheap, and 3) lasts forever on concrete, as the many "project-spots" on my back patio can attest to.

Here goes.

I wanted to CRY after I sprayed the first couple states.  I worked so hard chalking the California coastline!  And now it just looked all  . . . spray-painty.  It was not as pretty and perfect as the chalk!

I stood for a while with the can in hand, like a vandal who can't decide which swear-word to graffito on the side of a box car in the dead of night when the only emotions she can conjure up are angst and rebellion . . . and I finally decided the same thing that said vandal would decide: go ahead and finish.


And I'm so glad I did!  It actually turned out to look pretty good.  Kind of stylized.  At the very last minute, I remembered Alaska and Hawaii, so I spent another twenty minutes chalking those two and then painting them (I actually left out the skinny strip of Alaska that butts up against British Columbia.  C'est la vie.)


Now, time to help Truman become around-the-world champion of his fifth grade class.  {If they still play around-the-world.  Did any of you play it?  My fifth grade teacher, Mr. Wood, gave king-size candy bars to anyone who made it all the way around the classroom . . . ah, those were my days of glory.}