Wednesday, November 30, 2011

Inexpensive Gift Idea


So me and my hubby are in between jobs, which makes the gift giving part of the holidays a bit tricky.  I am sure many of you can relate to something similar. So this year we decided that this will not put a damper on our holiday cheer, but that we will do a HOME MADE CHRISTMAS!
A few things we are making the kids are: Quilts made from all the old levis I have been saving, swords from scrap wood we have. ( I have three boys,this could be dangerous) Hooded towels, with monster and superhero themes, and a friend of my sisters is giving away cute puppies so we are also making them a dog house (also from the scrap wood pile).  
It has been a lot of fun making things for them!
I also wanted to think of something for my sweet neighbors and friends and this is a affordable, great gift, and made with love!

So, here is my idea.
Found these at wally world 2.00 for a package of two.
Saweet!
They come really big, so I can make two hand towels out of one flour sack.
Now I have 4 hand towels at 50cents a piece!
Can we say FABULOUS!!??
Fold, measure, iron, and cut!
I sewed the cut seam with the same color thread
 There are so many different ways you could make these, but I liked this cute bird template I found on pinterest. Which inspired this design.
I also used stencils and black fabric paint on this project.
I got these two inch ones at Wally World, but you could also just make your own.
So go get some  inexpensive fabric or pull out your scrap fabric.
 Here is the finished product.
So easy and versatile.
I don't know any woman who couldn't use a few extra hand towels in there kitchen 
Happy Holidays 


Tuesday, November 29, 2011

Christmas wrapping: Recycle your Old Clothes

 My son had this old ratty box that obviously needed thrown away, but instead I decided to recycle.( Pat on back)
I have, below, an old holy pair of shorts (so fitting for this Holy season) and a pillowcase that was in the donate pile.
 I covered the box and lid with a hot glue gun!
Wrapped it just like a present.
Easy, breezy, wrapped up box!

 Next I added some scraps of cutesy Christmas paper in the bottom  to jazz it up a bit more!
 I next started choppin up the shorts.
 I made a few stripes about 8 inches long
 Chopped them in half and tied them together with the same fabric!
 OOOOOOoooo I am just so pleased with this parcel!
 Drum roll please...........
  Ta da the finished  reusable wrapped box!
 I also added some scrap ribbon to add a little more pizazz!

Happy Holidays Everyone!
I cant wait to see your ideas on reusable recyled wrapping!

Thursday, November 17, 2011

No Sew Ruffle Lamp Shade

MMMM..... I am loving all the neutral pallets lately. Burlap, canvas, duck weave, all incredibly delish! So slowly I am trying to move out some of the bolder colors in my front room and go more neutral, fresh, and light!
One piece at a time I will get there.
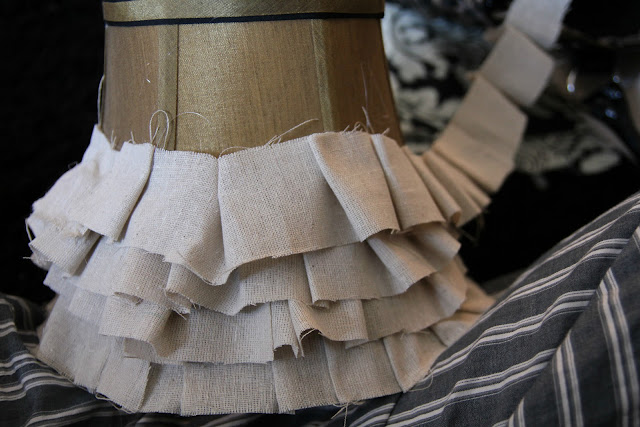
So I started with this lamp shade.
Notice the lovely stain I can't get out....HIDEOUS!

 I took this luscious fabric....oh I love the woven earthy look!
 Next I cut it into strips.
 Then, because I am a horrid at sewing, I hot glued pleats all the way down each of my strips.
 I then layered each strip onto the lamp shade hot gluing those down as well.
 I added a little rick rack around the top and a flower ...
 And voila! New, no sew, lamp shade.
Can't wait to do some pillows!

Sunday, November 13, 2011

Christmas Wrapping: Recycled Road Atlases

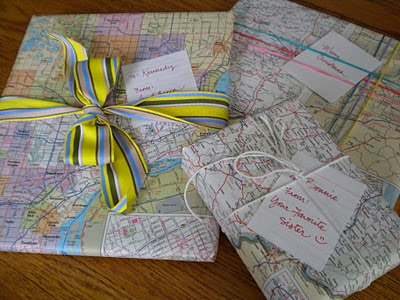
Since mine and my husband's families live so far apart (Idaho and Arkansas), we are used to driving long distances to visit family members. As a result of our cross-country trips, we have acquired several road atlases over the years. And when it comes time to update to a more current atlas, I don't throw away the old one . . . I DRAB TO FAB it :).
This is my favorite way to wrap presents for the following reasons:
  • cheap
  • pretty
  • recycling
  • cool
  • easy
I rarely even have to use scissors!  I just tear out a single sheet (or lift out a "double sheet" from the staples in the middle) and it's ready to go. {I don't recommend buying a spiral-bound atlas for either driving OR wrapping, because the pages you use the most get torn out when you still need them to find your way, and, you don't have the "double-sheet" that the staple-bound atlases give you for wrapping}.
If you have a larger gift, carefully remove
a "double sheet" from the center of the
atlas by pulling it up from the staples.
If you travel Tom-Tom style with a GPS and don't have a road atlas, snag an old one (or an outdated world atlas) at your local thrift store.  Siam and Burma may not exist on current atlas anymore, but we can keep them alive under our Christmas trees!
Tulle is my favorite "ribbon"
material, though I don't think it
goes with the map-wrapping as
well as the examples below.
Colored rubber bands:
cheap, easy, festive . . . 
. . . and cute!
The card is a folded 3x5 card from my
surplus of office supplies--I think it is the
perfect compliment to this type of wrapping  
If you want to use ribbon, get
pastel colors that compliment
the typical orange/pink/yellow/
green/blue color scheme found
on most political maps
Kitchen twine is always a classic choice
for your packages and parcels.
(Sneak preview of one of your gifts, Bon!)
One other fun idea is to add a toy car or two
to the outside of your package--especially
if it goes with the gift!
Stay tuned for more ideas from my wrapping-savvy sisters!  Happy Thanksgiving and Merry Christmas!

Friday, November 11, 2011

Brown Paper Packages

I wanted to show you all of the ways to use recycled grocery bags all at once, but some of my craft supplies are buried in the mountain of remodeling stuff. 
So I will have to show you a few ways over the course of the next few weeks!
Start asking your grocery boy to bag your food in paper bags now, so you can have a great stock pile to wrap with!

This first way is SUPER easy. 
And FREE!
So let's do a homemade gift bag, shall we?

First, get one of your old grocery bags out.
 Next, cut it in half.
 Third, get an old empty cereal box. 
(Start collecting them)
Make sure to take out the lining and cut off the top tabs!
Next,  cover your box with your grocery bag that has the words turned in!
 Now on to decorating. 
The possibilities could be endless. 
But I just pulled out a simple stencil packet I had purchased a while back. 
(Got it at Walmart for $1.97, and it has all the stencils pictured)
 Simply stencil the stencil of choice on the front of your gift bag, stuff your box with the presents you will be giving, and add some tissue paper.
I wanted to add a cute ribbon handle, but all my ribbon  is in that remodeling pile somewhere. 
So you will just have to envision it!

A perfect recycled way to wrap!
The best part of the box is that it stands so perfectly.
Happy Wrapping~

Tuesday, November 8, 2011

Book Page STAR

In Keeping with my book page Christmas Theme for this year, I am making star ornaments for my tree.  Soooo easy to make.  Buying these type of stars at the store are usually anywhere from $5-$10 a piece.  This one:  FREE NINETY FREE!!! And it seriously only took me 5 minutes!
You only need these 6 things to create these GORG stars!!!
Draw a star on a cereal box in any ol' way you'd like with permanent marker.
Cut out star and add score markes.  from tip to center, and from inner corners to center.  Score each with a box cutter (be careful not to cut all the way through.)

Cover side Opposite of the scores with an old book page.  Then cut off the excess.


Flip over, fold, then Ink to your hearts desire!  Now it's ready for your tree!!!
Now go make some ornaments of your own!!!